Saturday, February 28, 2009

There's been an addition...

I have some very exciting news. I'm not kidding, it's very exciting. In fact, I've been waiting anxiously all day to tell you. For the first time, I've plunked down my hard-earned cash and purchased my first ever 'big kid' toy. And it is a beautiful, no stunning, no dazzling digital SLR camera. I don't mean to brag, really. I've just been so excited about the newest addition to my family that I've been gushing like a breathless, first-time mother. Isn't she perfect?! Have you ever seen a more beautiful SLR in your life? She looks just like her mother, doesn't she? Er, I'm sure you can appreciate my enthusiasm.

But enough about my camera, it's time to talk about my breakfast. Saturday morning breakfast may very well be my favorite meal of the week. First, you can incorporate any food you like, sweet, savory, or in between, without even a hint of guilt. Second, you have all the time in the world to enjoy your creation. And third, you don't have to wait around impatiently all day to eat it. As per my usual Saturday morning routine, I woke up with thoughts of breakfast already floating through my brain. It was going to be a muffin morning, I could just feel it in the air. And bacon. Yes, bacon, that's sounds delicious. And so, before I had even tumbled out of bed, a plan was hatched for savory bacon-cheddar-green onion muffins. These are sinfully delicious, eye-catchingly unusual, and happily hearty breakfast pastry. On a cold February morning when the trees are bare and snapping around in the wind, nothing beats sitting down to a Saturday brunch of bacon muffins with apple jelly, scrambled eggs, and tea. Just nothing.

Adriana's Bacon Muffins
(for a Cold February Morning)

makes 6 muffins

Ingredients
4 slices bacon
3/4 cups all-purpose flour
1/4 cup cornmeal
1/4 teaspoon salt
1/4 teaspoon paprika
1/2 cup sharp cheddar cheese, shredded
1 egg
1/2 cup milk
2 green onions, white and light green parts chopped


Step one: Preheat oven to 400 degrees. Line 6 muffin cups with paper liners or lightly grease.

Step two: Cook bacon in a large skillet until crispy. Transfer to paper towels to drain, and reserve 1 tablespoon bacon fat from pan.


Step three: Whisk together flour, cornmeal, baking powder, salt, and paprika in a bowl, then stir in the cheese.

Step four: Beat together the egg and milk, and barely stir into the dry mixture.

Step five: Crumble bacon into the batter, add the bacon fat, and fold until just blended.

Step six: Spoon batter into the prepared muffin pan, bake for about 19 minutes, and then let cool for about 10 minutes before serving.


-Adriana

Monday, February 23, 2009

you can, too.


Way, way back when I was a freshman in college, I walked several times a week from my dorm on Washington Square East over to Broadway, then a couple of blocks North, and then made a right onto Astor Place, stopping at Astor Place Starbucks. I worked there as a barista. My fellow employees not-so-affectionately nicknamed it "Disaster Place", which should give you some insight as to how they felt about working there.

Because I made the walk so much, I noticed when a sign suddenly went up on Broadway for a store called Beard Papa's. Having no idea what it was, I wandered in and investigated. It was a store that sold cream puffs, almost exclusively. Its employees wore jumpers and paper hats, which struck me as rather odd. And how did a store expect to stay in business on Broadway in lower Manhattan by selling cream puffs?

It's now over four years later. I've graduated college, moved to Seattle, and moved back to New York. Beard Papa's is still there, somehow. And not only is it still there, but it now has another store in the West Village (about ten blocks away) that I pass almost daily as I hustle from the gym to the train. There must be something about cream puffs, because New Yorkers are clearly buying.

I've got to admit, I'm not really a fan of cream puffs. I know, shocking, isn't it? But Mary loves them, as do a whole lot of other people I enjoy spending time with. In case you're wondering, it makes people really happy to get a box of these little puffballs. But you know what makes them even happier?

When you make them yourself.

What's that? You don't think you can do it? Hogwash! I did, just this past weekend, and I know that you can, too. Know how I know that? Because they're really simple to make. They only take a few ingredients, and this recipe from Bon Appetit is very exact, so you don't have to do any of that guessing stuff (the guessing is what usually gets me into trouble).

All I have to say is that you should make these cream puffs. You can bake them into little, bite-sized party treats as I remember Adriana's mama doing once for a party when we were in high school. You can also make them into big, Beard Papa's-sized pastries that promise to dust the tip of your nose with powdered sugar. You can pipe the cream into the middle if you have a pastry bag, or you can cut a hat off the puff and spoon in the filling as I did. Whatever you do, make them the same day you plan to serve them, and don't assemble them until right before. That way, you'll be eating these puffs at their pillowy, creamy best.

Trust me on this one. You can do it. I know you can.
-Kylie

You Can Do It Cream Puffs
Adapted from Bon Appetit, March 1996
Makes about 18

Ingredients:

Cream Puffs:
3/4 cup water
3 Tb unsalted butter, cut into pieces
1/4 tsp salt
1/4 tsp sugar
3/4 cup all purpose flour (note: this isn't the time to use your
whole wheat flour)
3 large eggs

Filling:
1 cup chilled whipping cream
1 tsp plus 2 Tbs sugar
1 tsp vanilla extract

powdered sugar, for dusting

For cream puffs:
Preheat the oven to 375 degrees F. Grease a baking sheet or line it with parchment paper. Combine water, butter, salt, and sugar in heavy medium saucepan. Bring to a boil, stirring to melt butter. Add flour; using wooden spoon, stir vigorously until mixture clumps together, forming a ball. Stir one minute longer over the heat. Remove from heat and transfer dough to medium bowl. Using an electric mixer, add the eggs one at a time, beating until dough is smooth after each addition (dough will be slightly soft and shiny).

Using 1 rounded tablespoon of dough for each cream puff, spoon dough onto prepared baking sheet, spacing about 2 inches apart and forming mounds about 3/4 inch to 1 inch high and 1 1/4 inches in diameter. Using moist fingertips, gently press tops of cream puffs to flatten any peaks. Bake until golden brown, about 37 minutes. Transfer baking sheet to rack; let cream puffs cool. (Can be made 4 hours ahead. Let stand at room temperature.)

For filling:
Beat cream, sugar and vanilla in medium bowl until stiff peaks form. 

Cut the top third off each cream puff. Place cream puff bottoms, cut side up, on plates. Spoon filling into bottoms, mounding slightly. Top with cream puff tops and dust with powdered sugar.

Monday, February 16, 2009

come on over

Hallelujah; we have a couch! I may have mentioned the fact that we found an apartment. I was just a little excited. After all, it took a long time to find one. And now, we have a couch to go inside it. After several trips to IKEA, both in Brooklyn and Long Island, and also after a delivery attempt that taught us a thing or two about measuring living room doors as well as outside doors, we finally returned with a comfy, fluffy thing to sit ourselves down on. 
Now, you've got to understand that Mary was shopping for couches before we even found the apartment. To her, the couch is critical to comfortable living. She's a connoisseur of movies and television and considers couch comfort paramount to her trade. 
For me, I'm just happy to have another surface for people to sit on when they visit. I mean, now we can really have people over. To sit. And talk. And eat and drink (those last ones are key). Therefore, I made these cookies today. I think they're perfect to go with tea or coffee. They aren't very sweet and aren't too fancy. They just say, "Hey. Stay awhile. Have some tea with me. Savor the afternoon, the light, the couch cushion under your tush. Let's share a moment." These cookies kind of say all the things I want to say to you but am just too shy to say. 
So, anyway. Thanks for coming. I hope you'll take it easy, and don't feel like you're intruding. Do you take cream or sugar? Oh, and have a cookie, just something to nibble while we wait for the kettle to boil.

-Kylie
Lemon Cornmeal Cookies
From Tish Boyle's absolutely fabulous The Good Cookie

1 1/4 cups all-purpose flour
3/4 cup yellow cornmeal
1/4 tsp salt
3/4 cup (1 1/2 sticks) unsalted butter, softened a little
2/3 cup granulated sugar
1 tsp finely grated lemon zest
1/2 tsp vanilla extract
1 large egg
1 large egg yolk
coarse sugar for sprinkling

Position a rack in the center of the oven and preheat the oven to 350 F. Butter two baking sheets.

In a medium bowl, whisk together the flour, cornmeal, and salt. Set aside. 

In the bowl of an electric mixer, beat the butter, sugar, lemon zest, and vanilla extract at medium-high speed until light, about 2 minutes. Beat in the egg, then the yolk, beating well after each addition and scraping down the sides of the bowl as necessary. At low speed, add the flour mixture and mix just until blended.

Shape the dough into 1-inch balls and arrange them 2 inches apart on the baking sheets. Moisten your palm to prevent sticking, and flatten each ball into a 1 1/2 inch disk. Sprinkle the cookies with coarse sugar (or maybe extra cornmeal?) and bake, one sheet at a time, for 12 to 14 minutes, until lightly golden around the edges. Transfer to a wire rack and cool completely.

Sunday, February 15, 2009

If love had a flavor...

If love had a flavor, it would, without a doubt, be some combination of raspberries, pancakes, and bittersweet chocolate. At least, that's what I decided Saturday morning when I set out to make a dessert for Valentine's Day dinner with my beau. The goal was simply to make a confection just for him. Nothing experimental, nothing exotic, nothing that screams "I've just been reading my Gourmet magazine and I'm not afraid to prove it!" No, it was Valentine's Day, and a perfect time to thank him with a dessert tailored just to his particular taste buds. After all, the man had been ever patient with my burned brownies, deflated meringues, and over-spiced biscotti and truly deserved a culinary break.

So, with eyelashes batting and heart aflutter, I set out to bake a cake that proclaimed "I understand you, and I love you" (and preferably not by spelling out the message on top with chocolate chips, though this had, indeed, been reserved as a back up plan.) I had three clues about my sweetheart to help me on my way: 1) nothing makes the boy happier than if you bring him a pint of raspberries, 2) he consumes an average of 1/2 gallon of chocolate milk a week, and has done so since he was five years old, and 3) on the nights we don't have dinner together, there's a 50% chance he's making himself pancakes for the evening meal.

Pancakes...Raspberries...Chocolate...Pancakes...Raspberries...Chocolate....I puzzled and puzzled.

And then I remembered an exquisite-looking recipe on one of my favorite sites, Smitten Kitchen, for a Bittersweet Chocolate Pear Cake made with browned butter, in other words, a perfect jumping off point for my own enamored attempt at baking love into a 9-inch cake pan. If I simply substituted raspberries for the pears and upped the brown butter quotient (a flavor which always does remind me of the crispy edges of a perfectly grilled pancake) I would have the ultimate, boyfriend-centric cake!

When I unveiled my creation to him that evening, his eyes grew wide. "Are those...raspberries...?"

Mission accomplished.


Bittersweet Chocolate Raspberry (Pan) Cake


Ingredients
1 cup all-purpose flour
1 tablespoon baking powder
1/4 teaspoon salt
3 eggs, at room-temperature
1/2 cup (1 stick) unsalted butter
3/4 cup sugar
1-2 pints fresh raspberries (depending on your preferences)
10 oz. good quality bittersweet chocolate bar, chopped into chunks

Step one: Preheat the oven to 350°F. Butter a 9-inch cake pan and dust with flour until evenly coated.

Step two: Sift together the dry ingredients (flour, baking powder, and salt) and set aside.

Step three: Using a mixer with the whisk attachment, whip the eggs on high speed for about 5-9 minutes (depending on the strength of your machine), or until they become very thick and pale colored.

Step four: While the eggs are in the mixer, brown the butter. Heat the butter in a medium-sized sauce pan over medium head, stirring frequently. Cook it for about 6 - 8 minutes until it begins to turn brown and smell nutty. Be careful not to overcook it (as I did the first time) so that you get black specks in the bottom of your pan. When butter is browned, remove from the heat.

Step five: Add the sugar to the whipped eggs and keep mixing for a few minutes more. Turn the mixer down to stir and alternate adding the flour mixture and the browned butter until it's barely combined (you don't want to over-mix).

Step six: Pour the mixture into your prepared pan, and then sprinkle the raspberries and chocolate chunks on top. During the cooking process, these pieces will be enfolded by the rising cake, so don't let this alarm you. Bake until the cake is golden brown and springs back to the touch (about 40 to 50 minutes). A toothpick inserted into the center of the cake should come out relatively clean. Sprinkle the finished cake with powdered sugar if you like, and serve it with ice-cream, whipped cream, or anything else in the cream-department.

Sunday, February 8, 2009

A mini Thai vacation for $1.99

I've been thinking about Thailand a lot lately. Maybe it's because of the weather. Maybe it's because two of my friends are currently calling the country home. Maybe it's because I just used up the last of my Thai red curry paste. Whatever the reason, I've searched flight prices more than once in the last week, each time only to discover that the $1400 required for the plane ticket falls just north of my 'fun budget' for the year. Sigh.

That's why when I found a $1.99 bag of Thai black rice the other day, my heart literally skipped a beat. If the sandy beaches and the exotic culture were out of my price range, the cuisine was most certainly not. I had a vague recollection of seeing a thai black rice pudding recipe somewhere among the my cook book cannon, so I snapped up that bag of rice and made a beeline for my pots and pans. A quick bit of searching unearthed the source of my memory. Lorna Sass, once again coming to the rescue, had included a recipe for Coconut-Black Rice Pudding.

Black rice may officially be the most beautiful grain with which I have ever worked. It's a squid-ink black as you wash it, and immediately taints any water it touches with a deep purple. As it cooks, this sweet rice takes on a indigo hue, and cooks up into what must be the most gorgeous rice pudding in the whole wide world.

Thai Coconut-Black Rice Pudding with Mango

Adapted from Whole Grains Every Way, Every Day
serves 6

Ingredients:
1 cup Thai black sticky rice or Chinese black forbidden rice, rinsed
Pinch of salt
1 can (14 to 15 ounces) unsweetened coconut milk
4 tablespoons sugar, to taste
1 fresh mango (or frozen equivalent)

Step one: In a heavy 2-quart saucepan, bring 1 ¾ cups of water to a boil. Add the rice and salt and return to a boil. Cover, reduce the heat, and simmer until the rice is tender, 25 to 30 minutes. It’s all right if there is some unabsorbed water.

Step two: Stir in the coconut milk and sugar to taste. Bring to a boil. Reduce the heat and boil gently, uncovered, stirring occasionally to prevent sticking, until the rice absorbs most of the coconut milk, about 10 minutes. Leave the mixture slightly soupy since the rice will continue to absorb the coconut milk as it sits.

Step three: Spoon into individual dessert bowls or use martini glasses for special effect. Garnish with chunks of chopped mango. Serve warm, room temperature, or chilled.
-Adriana

Monday, February 2, 2009

The most comforting of comfort foods

Last night I was needing some comfort, and the obvious first place to look for it was in my kitchen. Rummaging around in my cabinet, I spied the usual suspects: mac & cheese, brownies, my roommate's chips ahoy. "No, no, no, that's not it at all," I found myself lamenting. "Why doesn't my kitchen cabinet understand how I feel?"

And that's when I saw the humble butternut squash resting on the third shelf. During my last weekly shopping trip I had gathered the ingredients for an intriguing recipe that has appeared in my most recently copy of Gourmet. The roasted butternut squash galette had caught my eye, as it reminded me of the best pizza I have ever eaten (butternut squash with asiago, sage, and caramelized onions, which I stumbled upon in a small cafe called Veggie Planet hidden in a Boston suburb.) The recipe looked easy enough for my battered brain to handle, so I retrieved my gourd and went to work.

An hour's work resulted in a pastry that was everything I had hoped and dreamed it would be. A tried and true comfort food. Warming through and through. Having discovered this secret, I wondered if I were now obligated to send roasted butternut squash galettes to each and every person who has had a rough day. I almost wish I could. But since I'm not sure how I would safely send a flakey tart through the United States Postal Service, perhaps I should just tell you how to go about making your own. After all, if you're in need of a bit of comfort, I highly recommend turning to this warm, savory pastry. It has charming goat cheese, lovable sauteed leeks, soothing chopped sage, and sweet butternut squash all baked into a flakey pastry made golden with brushed on eggs. While my dinner didn't and couldn't fix all my troubles, one warm bite was enough to convince me that, in the end, everything was going to be alright.

Roasted Butternut Squash Galette
Adopted from Gourmet Feb. 09

Ingredients - For Pastry
1 1/4 cups all-purpose flour
1 stick cold unsalted butter, cut into 1/2 inch cubes
1 tablespoon chopped sage leaves
1/2 teaspoon fine sea salt
4 to 6 tablespoons ice-cold water
1 large egg, lightly beaten

Ingredients - For Filling
1 (2 lb.) Butternut squash, peeled, seeded, and cut into 2 by 1/4 inch slices
1/2 teaspoon fine sea salt
3 tablespoons olive oil, divided
2 leeks (white and pale green parts only), thickly sliced crosswise
6 oz soft mild goat cheese, crumbled

Step one: Make the dough. If you are short on time, you can always use a pie crust mix instead. That being said, a mix will never ever be as delicious as one you make yourself from good quality butter. Pulse flour, butter, sage, and sea salt in a food processor until mixture resembles coarse meal. If you do not have a food processor, use a hand-held pastry cutter instead. Drizzle ice water evenly over the mixture and pulse or mix until it just forms a ball. Gently press dough into a 5 inch disk and chill, wrapped in plastic wrap, until firm, at least 1 hour.

Step two: While dough chills, start your filling. Preheat oven to 500 degrees F with rack in the middle position. Toss squash with sea salt and 1 tablespoon oil and arrange in 1 layer in on a large baking sheet. Roast, stirring once halfway through, until golden brown on edges and undersides, 20 to 25 minutes. Remove squash from oven and reduce oven temperature to 375 degrees F.
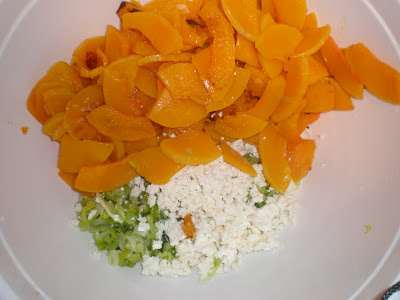
Step three
: Wash leeks, then cook in remaining 2 Tablespoons oil with a pinch of sea salt in a 10 inch heavy skillet over medium heat, partially covered, and stirring occasionally, until tender, 10 to 15 minutes. Transfer to a large bowl to cool slightly. Add squash, goat cheese, and 1/4 teaspoon pepper and toss gently.

Step four: Roll out dough into a 13 inch round on a lightly floured surface with a lightly floured rolling pin. Transfer to a baking sheet. Arrange filling in an even layer in center of dough, leaving a 2 to 3 inch border. Fold dough in on itself to cover outer rim of filling, pleating dough as necessary. Brush pastry with beaten egg and bake galette until crust is cooked through and golden on edges, 35 to 45 minutes. Cool on baking sheet on a rack 10 minutes before serving.
 

Subscribe in a reader

Adriana Willsie and Kylie Springman ©2009