
Sunday, October 11, 2009

my marathon


Today, as many of you know, is the Chicago Marathon.  Runners from all over the country woke bright and early and set off on a course across the Windy City.  Good for you, I say!

Today, as many of you don't know, I had my own marathon...in my kitchen (no surprises there).  While scores of toned athletes were burning off thousands of calories, I was in my kitchen turning thousands of calories into tasty autumnal treats.  Don't laugh, I've been training every bit as hard as those runners, and I have the ill-fitting jeans to prove it.  I've given up sleep and a social life in order to spend upwards of 25 hours a week in intense training.  I've lost blood (darn paring knife) and shed tears (dumb onions).  The only difference I can see is that after all that work, instead of crossing a finish line, I tucked into a big bowl of sweet potato gnocchi with fried sage and brown butter with a side of brussel sprouts braised in white wine and thyme, followed by pumpkin pie with walnut brown sugar topping, and vanilla sweet brown rice pudding.  And after that very last bite, I did indeed feel as though I had just run a marathon. 

Most normal people don't spend the first three hours of their Saturday morning browsing the farmers market.  And most normal people don't then come home and spend the next 7 hours cooking dinner (with breaks along the way for breakfast and lunch, of course).  But then again, most normal people don't love food so much that they read blogs about what other people are eating, so I feel as though I'm in good company here.  And that's why I'm going to share this recipe for homemade sweet potato gnocchi with you.  Even though it takes a painstakingly-long time to form each and every last gnocchi, you fine folks might just be crazy enough to try it.  By the way, I recommend that you do.  It goes even faster and tastes even better if you have some friends helping you.  Nothing is more delightful than spending a chilly fall day in your kitchen, rolling gnocchi with a friend.
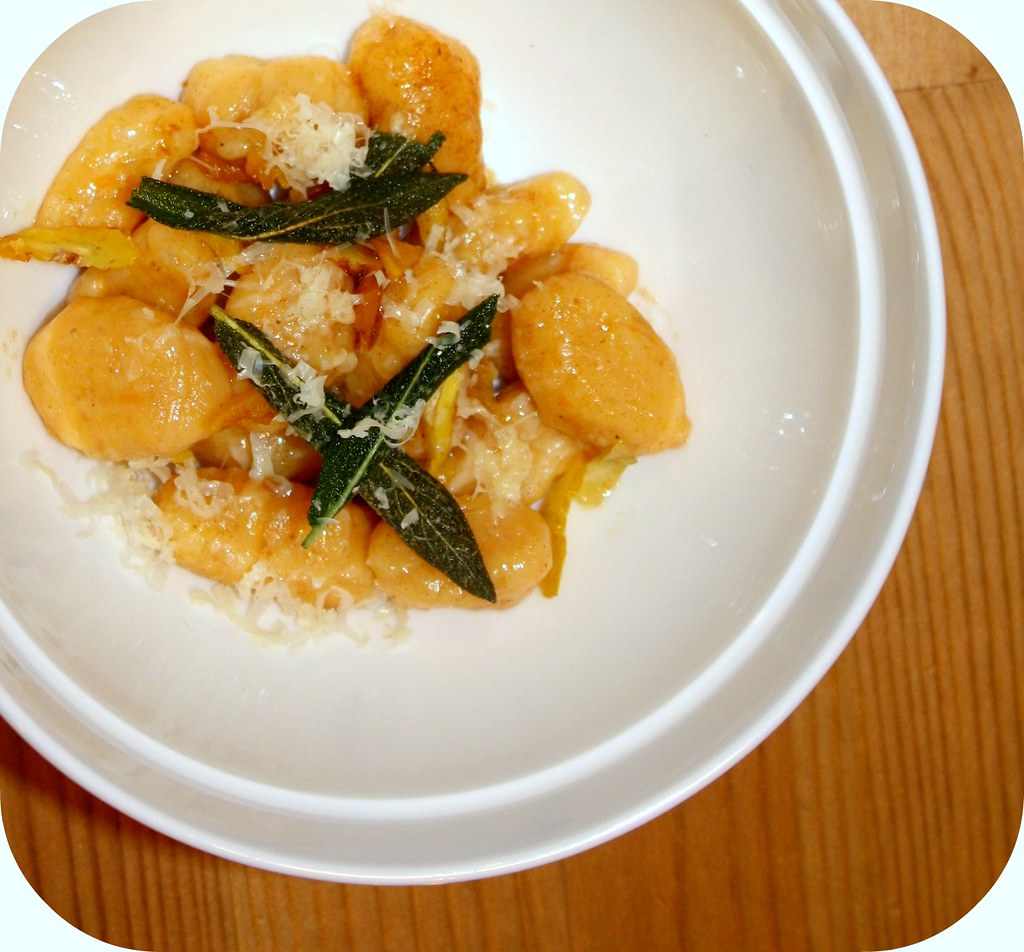


Sweet Potato Gnocchi with Fried Sage and Chestnuts
Adapted from the October 2009 issue of Gourmet

Ingredients
1.25 lb russet or idaho potatoes
.75 lbs. sweet potato
1 large egg
1/2 teaspoon grated nutmeg
1/3 cup grated Parmesan
2 cups all-purpose flour, plus extra for rolling the gnocchi
1/3 cup extra-virgin olive oil
1 cup sage leaves
1/3 whole chestnuts
4 tablespoons unsalted butter
salt
freshly ground black pepper

Step one:  Bake potatoes.  Preheat oven to 450 degrees.  Pierce potatoes in several places and bake until tender, about 1 hour.  Peel and cool potatoes, and then mash them until no lumps remain.  Allow potatoes to cool completely.
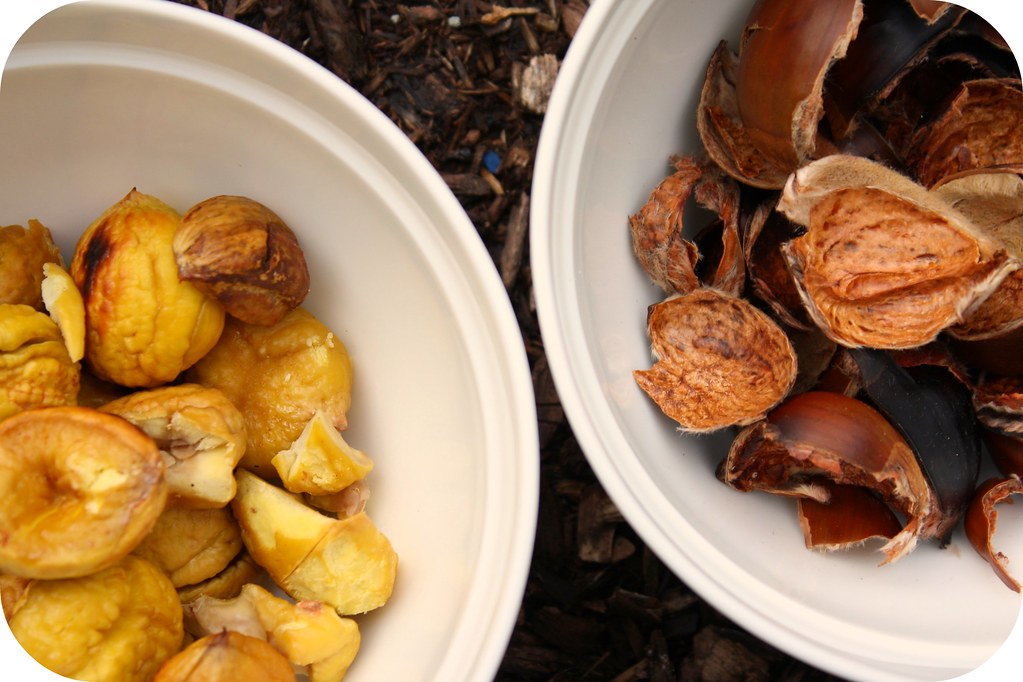

Step two:  Prepare chestnuts.  While potatoes are baking, score an "X" into the bottom of each chestnut with a paring knife.  Roast or broil chestnuts under high heat until the skins begin to pull away from the "X", about 15 min.  Remove from oven, and peel away outer and inner shells while still hot.  If they cool too  much during this step, reheat and then continue to peel.  Slice chestnuts very thinly.

Step three:  Make dough.  Beat together egg, nutmeg, 1 tsp salt, and 1/2 tsp pepper.  Mound potatoes in the middle of a floured sheet pan, and form a well in the center.  Pour egg mixture inside, and knead until incorporated.  Knead in cheese and 1.5 cups of flour.  Add more flour if necessary and knead until the you have a smooth and slightly sticky ball of dough.


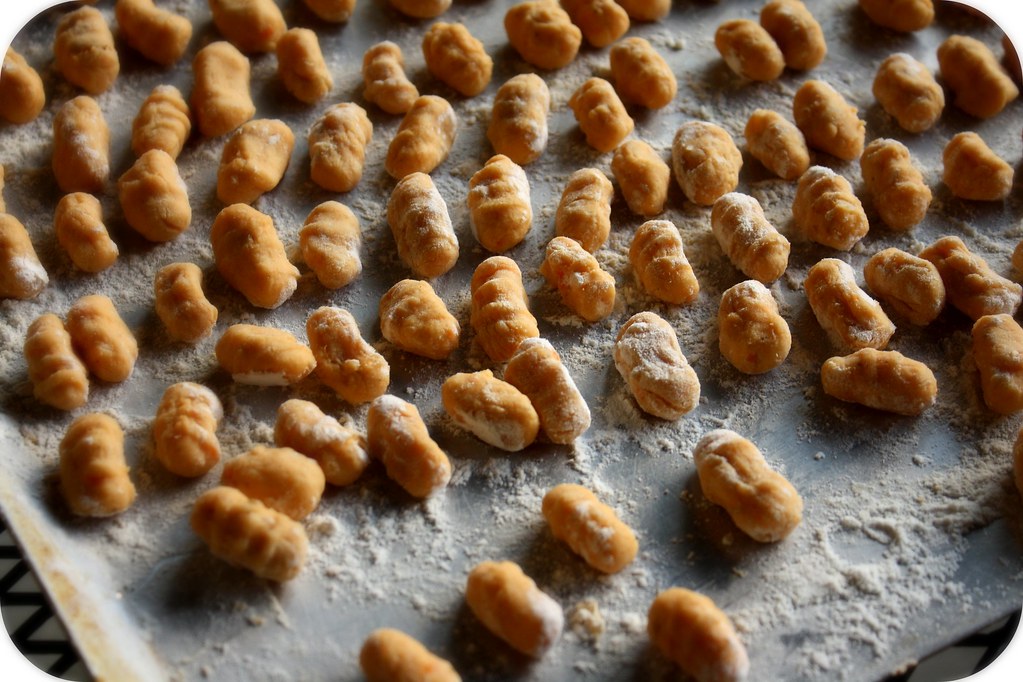
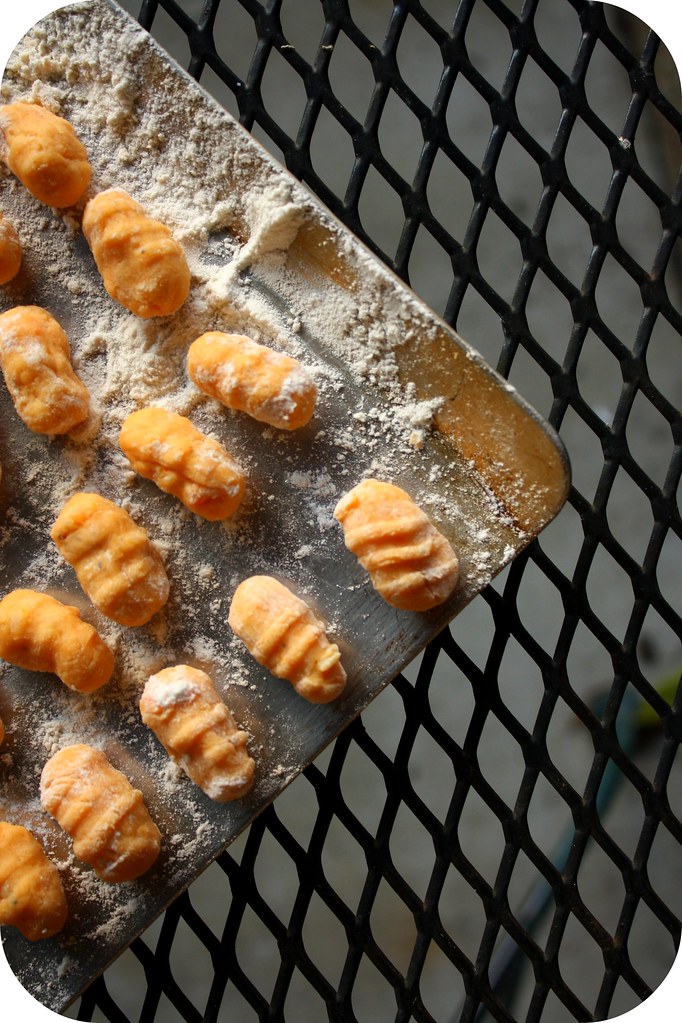
Step four:  Form the gnocchi.  Cut the ball of dough into 6 equal pieces.  Form each piece into a rope about 1/2 in. thick, and cut rope into 1/2 in thick pieces.  Roll each piece into a small ball and lightly dust with flour.  Roll each ball down the tines of a fork, so that you have a slightly-cylindrical and grooved gnocchi.  Place each on a baking sheet.

Step five:  Fry sage and chestnuts.  Heat oil in a skillet.  Fry sliced chestnuts until golden, remove from oil and set aside.  Using the same oil, fry sage leaves in 2 batches, leaving them in the oil for about 20-30 seconds a batch.  Transfer to paper towels and season lightly with salt. 

Step six:  Make the sauce.  Add butter to the skillet (without discarding the oil) with about 1/2 tsp salt and cook until golden brown, about two minutes.  Remove from heat.

Step seven:  Boil gnocchi.  Bring a large pot of heavily salted water to boil.  Boil half of gnocchi at a time, adding to the water and stirring.  Cook until they begin to pop up to the surface, about three minutes.  Using a slotted spoon, transfer to the skillet and coat with the butter sauce.  Heat all gnocchi in a skillet over medium heat, stirring so that it's evenly coated.

Step eight:  Serve.  Place a portion of gnocchi in a bowl.  Top with a few sage leaves and a sprinkling of chestnuts.  Add more grated cheese if desired.
-Adriana

Monday, October 5, 2009

spinning into butter

How to Make Cultured Butter

I grew up in a world awash with margarine. I remember dipping my knife into a beige tub of it straight from the refrigerator. With little resistance, I would scoop out a lump and slather it easily onto a whole wheat roll. It melted easily and soaked the bread with its oily yellowness. I didn't think a whole lot about it. It was the nineties, and my parents were into being healthy and exercising. Back then, margarine was part of that.

I can't quite pinpoint the moment my world shifted from margarine as health food to margarine as toxin. It could have been junior year of college when I read Michael Pollan's Omnivore's Dilemma and tried to understand trans fats for the first time. Maybe it really sunk in when New York City's Board of Health became the first in the nation to ban the use of artificial trans fats (the kinds in margarine and other hydrogenated oils) at restaurants. I guess it doesn't really matter when it was, but sometime between Y2K and now, my world changed from one where my friends and family cooked and baked with margarine for "health" to one where they use butter without fail.

Still, the mistaken association between butter and health problems pervades television commercials and women's magazines. Multinational corporations continue to produce butter substitutes made with rancid oils, selling products which are actually far more damaging to our health than the lowest-nutrient butters on the market. Soy, corn and cotton can all be used to make the ingredients that comprise a butter substitute, and food-producing corporations have a glut of all three due to monocropping practices.

The thing is, people will only be swayed by marketing for so long. High quality pastured butters become available at more grocery stores every day, and many boutique food stores now regularly carry cultured butter like that of Vermont Butter and Cheese Company. Once you taste a good cultured butter slathered on fresh bread, you're transported to a world where butter has taste and where it needs some good sea salt, a world where have to ask yourself, "How was I passing this up?".

This post is in the spirit of putting a stop to the passing up of butter. That is my mission, and I hope you'll accept it. I wanted to make butter because I came across this article while internet browsing during lunch at work, and butter making sounded to me both daunting and delicious. Subsequent Googling yielded the unanimous bloggers' consensus that homemade butter is far superior to even that of Vermont Butter and Cheese. I had to know.

And so Mary and I made butter. We bought our cream and yogurt fresh from the farmers' market, we fermented overnight, we cooled the cream in the fridge. We shook a jar for half an hour until the butter separated from the buttermilk, and (Eureka!) we were victorious.

Everyone else on the interweb was right: It's easy to make butter. It tastes good. Oh, does it taste good. And it's good for you. Really, really good. As I understand it, butter made from the milk of cows that have been eating grass (or "pastured") in the fall and spring is high in both Vitamins A and D. It is high in both selenium and cholesterol, protecting against cancer and heart disease. If you have questions about  more of the specific health benefits of butter, check out this Weston A. Price Foundation article, "Why Butter Is Better". It will also answer some questions if you scratched your head when I said that cholesterol helps to protect against heart disease. Culturing the butter increases its enzyme content and makes it easier to digest. It also makes it taste even more incredible.

The Butter-Making Process

Cultured Butter
Adapted from The Atlantic


1 pint of heavy cream (not ultra-pasteurized; that won't become butter)
3 Tbs. plain yogurt with live cultures
A pinch or two of good sea salt to taste

*Note: Do not make butter on a hot day, as the butter will not separate from the buttermilk properly. I made it on a day that was about 70 degrees, and everything went fine, as I chilled the cream before shaking it.

Pour heavy cream into a mixing bowl and add the yogurt. Stir to mix, cover with a towel, and leave at room temperature for 12 to 24 hours, until the cream has thickened slightly and developed a slightly tangy taste.

Pour cream into a large jar with a lid that closes tightly, and place in the refrigerator for an hour or two. The cream should cool to between 60 and 66 degrees Fahrenheit. Once it has cooled, you can separate the butter from the buttermilk in one of three ways. You can pour it into a food processor and process it for 5 to 6 minutes until the butter separates from the buttermilk. The butter will look clumpy and yellow, and the buttermilk will be a translucent white. You can also mix it with a stand mixer. Just be sure to cover it well so the cream doesn't splash you and your entire kitchen. You can also do it the fun way and work up a sweat like I did. Shake it vigorously in a jar until it separates, about 30 minutes. I recommend finding yourself a shaking buddy and alternating every five minutes.

One the butter has separated from the buttermilk, strain the clump of butter in a colander and reserve the buttermilk for use in another recipe. Place the butter in a large bowl of ice water, and work to buttermilk out of it with your hands. The buttermilk will make the water cloudy. Strain the butter out of that and put it in a new bowl of ice water, repeating this squeezing process until the water stays clear, to to three times. Remove the butter and pat it gently with a towel to remove water droplets on its exterior. Work a couple of pinches of good salt into it with your hands (if you want salted butter). Transfer the butter to a ramekin or small bowl and cover tightly. It will keep for several weeks in the refrigerator, or several months in the freezer.

-Kylie

Wednesday, September 30, 2009

cooking meat: not as scary as it seems

Pork Ribs

What does a person do with a whole entire rack of pork ribs?

The thing was, I didn't know. Until maybe a year ago, I almost never cooked meat. I ate it every once in a while (except for that month or so after freshman year of college where I tried out veganism, but let's skip right over that, shall we?), but I was intimidated by actually handling it, by consciously searching it out to eat. That started to change four and a half years ago when I found myself a girlfriend whose end-all, be-all favorite food ever was pork. It changed even more when I finally visited a nutritionist who cited tens of thoroughly sound reasons that it's important for people to search out and consume high quality meat.

And so here I am, trying to figure out how to make hamburgers in a skillet, guestimating just how long it takes to broil a salmon fillet, and even handling racks of pork ribs from the farmers' market as if I had some semblance of an idea what the heck I'm doing with this big chunk of, well, flesh. As I've been doing a lot lately, I turned to Nigel Slater, who offered up just the right recipe for me. Then I made a whole lot of changes, so the recipe really isn't much like Nigel's at all. Oh well. Just remember, when you're making these, to keep a careful eye on them so they don't burn. Other than that, they couldn't be easier. Just marinate and bake. Also, you'll want to find the best ribs you can for these, because this recipe shows off their flavor. I recommend paying a visit to your local farmer to support that delicious, nearby pork.

Pork Ribs with Honey and Ginger
Adapted from The Kitchen Diaries


7 heaped Tbs. thick honey
2 Tbs. tamari or soy sauce
1 Tbs. miso paste
4 cloves garlic, minced
1 1/2 tsp. crushed red pepper
1 'thumb' of ginger, minced
1/2 tsp. black peppercorns, crushed in mortar and pestle
3 1/2 lbs. meaty pork ribs

In a large mixing bowl, whisk together honey, tamari, miso, garlic, red pepper, ginger, and black peppercorns. Cut ribs into groups of two or three, place in bowl and coat completely with sauce. Cover bowl and place in the fridge to marinate for an hour or as long as overnight. When ready to cook, preheat oven to 350 degrees. Empty ribs and marinade onto a large baking dish. Bake for one hour and fifteen minutes, turning a few times and basting with sauce to make sure they don't burn. When done, they should be not quite falling off the bone. Serve atop rice, spooning remaining sauce over ribs as they are plated.

Serves 3 to 4.

-Kylie

Sunday, September 27, 2009

The best minute of the year


5:18 pm EST, Tuesday, September 22, 2009.  A minute that will live in infamy.  A minute above all others.  A minute worth writing home about. 

Also known as the first minute of fall.

You might say that fall is my favorite season.  Those who know me better might say that I have an unhealthy obsession with all things autumnal.  It’s okay, I’ll own up to it.  I sometimes feel as though the fall was specifically designed with my likes and preferences in mind.  Someone took a good look at what I most like to eat, wear, think about, participate in, discuss, and enjoy, and bundled it all up into one stunningly perfect three-month period.  Let’s just say, the fall fits me like a freshly-knitted glove.

To celebrate the new season, my boy took me to Heinz Orchard yesterday for a quality apple picking date.  Swooon.  This has become somewhat of a tradition.  It usually begins with me stockpiling apple-based recipes for weeks in anticipation, and then usually ends with me cooking apple-based treats for weeks afterwards, until the boy begs for just one apple-free meal. 

This year’s trip has proved to be no different.  And after lugging two pecks of apples (roughly 70) back to my small Chicago apartment, I immediately set to work turning them into my favorite things to eat.  So far, I’ve made apple butter, butternut squash and apple soup with bacon, and the tastiest pancakes I’ve had in a good long while.  So tasty, in fact, that I’m going to share the recipe with you.  But before I do, please send me your favorite apple recipes!  I have a lot of apples to go through, and I need all the inspiration I can get.  So, without further ado…

Dutch gouda and raisin whole-wheat pancakes with apple-cinnamon compote
Makes enough for two

1 tablespoon butter
3 small apples, peeled, cored, thinly sliced
½ tsp cinnamon
1 tablespoon brown sugar

1 cup whole-wheat pastry flour
1 tsp baking powder
¼ tsp. salt
1 tablespoon sugar
1 egg
1 cup whole milk
¼ cup raisins
½ cup Dutch gouda or other cheese, shredded finely
butter, for greasing skillet

Step one:  make apple compote.  Heat butter in skillet over medium-low heat.  Add apple slices, cinnamon, and brown sugar, and stir until evenly coated.  Cook apples, stirring occasionally until very soft, about 20 min.  If the mixture becomes too dry before apples are done, add ¼ cup water.

Step two:  Pour ¼ cup boiling water over raisins and set aside.  Water will absorb into the raisins to make them soft.

Step three:  Mix together flour, baking power, salt, and sugar in a bowl.  In a separate bowl, beat egg and milk until well mixed.  Pour wet ingredients into dry and stir just to incorporate.  Add softened raisins and shredded cheese and mix to incorporate.

Step four:  heat buttered non-stick skillet over medium heat.  Pour ¼ cup of batter into skillet and cook pancakes until golden brown on both sides.

Step five:  Sprinkle pancakes with powdered sugar and top with apple compote.  Drizzle pure maple syrup on top for additional sweetness if desired.

-Adriana

Friday, September 25, 2009

nigel slater's plum (i mean apple) cake

Apple Cake and Cream

"I have always felt that a recipe should be something to inspire, remind and lightly influence rather than a set of instructions to be followed, pedantically, to the letter."
-Nigel Slater


Since I bought Nigel Slater's The Kitchen Diaries a few years ago, it's made every move with me. Dorm to dorm to house to house to apartment, The Kitchen Diaries is always the key book that gets packed, right after the socks and rainbow flair and other daily essentials. It's like a security blanket to me, the book I can pull out when I feel like plopping down on the couch and reading with a cup of tea.

This book has served me well. It's just as good to cook from as it is to sit and read. It's organized by seasonality into months, so I can easily flip to the right section when I want to make something and don't quite know what. And to be truthful, I think Nigel and I may be connected by blood in some far-off capacity. Learning about his sensibilities around food feels like coming home to me, and he's always saying what I mean better than I could.

First Fall Apples

Nigel loves food when it's dressed-down, unfussy. He takes his fruit just at the tip of its freshness, spilling over into too-done juiciness. He isn't particular about measuring and doling out patronizing instructions; rather, he seems to know that you know what's best and that you know what you like.

In short, I felt that Nigel might just be okay with me making his plum cake with what I had on hand instead: the first little New England McIntosh apples of the season. I took a few liberties, as well, baking it in a springform pan instead of a square pan because I didn't have one, and substituting quite a bit of the flour with white whole wheat flour. I don't think this cake was worth for the wear. Crumbly and stuffed chock-full of apples, it uses very little sugar and flour, making it just as nice to serve alongside your breakfast eggs and coffee as it is as an after dinner treat topped with vanilla whipped cream.

Butter and Sugar, Natural Light

Nigel Slater's Plum (I Mean Apple) Cake
Adapted form The Kitchen Diaries

 10 Tb butter
1/2 cup sugar
6 McIntosh apples
3 large eggs
2/3 cup white whole wheat flour
1/3 cup all-purpose flour
1 3/4 Tbs. baking powder
2/3 cup ground almonds
1/2 cup shelled walnuts

Set the oven to 350 degrees. Line the base of a square 8-inch cake pan or springform pan with parchment. Grease the pan's sides.

Beat the butter and sugar until pale and fluffy with an electric mixer. Beat it until it is, as Nigel says, "light, soft and the color of vanilla ice-cream". Peel and core the apples and cut each one into eight sections.

Break the eggs, beat them lightly with a fork, then add them bit by bit to the butter and sugar. Whisk together the flour and baking powder, and fold them gently into the mixture using a wooden spoon. In a food processor, grind 2/3 of a cup of almonds until they are the texture of cornmeal, and fold them into the batter. Chop the walnuts to "the size of small gravel" and fold them in, too.

Scrape the mixture into the cake pan, dropping the apple sections in on top. Push the apples down into the batter a bit. Bake for 45 minutes, then test for doneness by inserting a paring knife to the bottom of the pan. If it comes up clean and free of batter, the cake is done. Remove the cake from the oven and let it cool for fifteen minutes before turning it gently out of the pan.

Cut into slices, and serve alone, with whipped cream or a drizzle of heavy cream.

Serves about 12


Apple Cake -Kylie
 

Subscribe in a reader

Adriana Willsie and Kylie Springman ©2009