Wednesday, September 30, 2009

cooking meat: not as scary as it seems

Pork Ribs

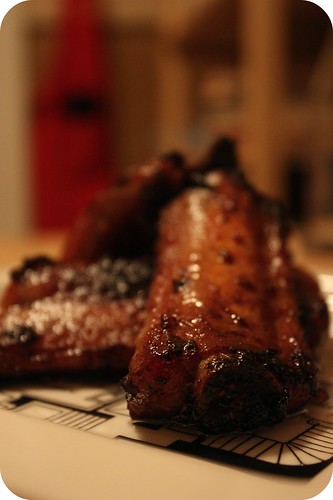
What does a person do with a whole entire rack of pork ribs?

The thing was, I didn't know. Until maybe a year ago, I almost never cooked meat. I ate it every once in a while (except for that month or so after freshman year of college where I tried out veganism, but let's skip right over that, shall we?), but I was intimidated by actually handling it, by consciously searching it out to eat. That started to change four and a half years ago when I found myself a girlfriend whose end-all, be-all favorite food ever was pork. It changed even more when I finally visited a nutritionist who cited tens of thoroughly sound reasons that it's important for people to search out and consume high quality meat.

And so here I am, trying to figure out how to make hamburgers in a skillet, guestimating just how long it takes to broil a salmon fillet, and even handling racks of pork ribs from the farmers' market as if I had some semblance of an idea what the heck I'm doing with this big chunk of, well, flesh. As I've been doing a lot lately, I turned to Nigel Slater, who offered up just the right recipe for me. Then I made a whole lot of changes, so the recipe really isn't much like Nigel's at all. Oh well. Just remember, when you're making these, to keep a careful eye on them so they don't burn. Other than that, they couldn't be easier. Just marinate and bake. Also, you'll want to find the best ribs you can for these, because this recipe shows off their flavor. I recommend paying a visit to your local farmer to support that delicious, nearby pork.

Pork Ribs with Honey and Ginger
Adapted from The Kitchen Diaries


7 heaped Tbs. thick honey
2 Tbs. tamari or soy sauce
1 Tbs. miso paste
4 cloves garlic, minced
1 1/2 tsp. crushed red pepper
1 'thumb' of ginger, minced
1/2 tsp. black peppercorns, crushed in mortar and pestle
3 1/2 lbs. meaty pork ribs

In a large mixing bowl, whisk together honey, tamari, miso, garlic, red pepper, ginger, and black peppercorns. Cut ribs into groups of two or three, place in bowl and coat completely with sauce. Cover bowl and place in the fridge to marinate for an hour or as long as overnight. When ready to cook, preheat oven to 350 degrees. Empty ribs and marinade onto a large baking dish. Bake for one hour and fifteen minutes, turning a few times and basting with sauce to make sure they don't burn. When done, they should be not quite falling off the bone. Serve atop rice, spooning remaining sauce over ribs as they are plated.

Serves 3 to 4.

-Kylie

Sunday, September 27, 2009

The best minute of the year


5:18 pm EST, Tuesday, September 22, 2009.  A minute that will live in infamy.  A minute above all others.  A minute worth writing home about. 

Also known as the first minute of fall.

You might say that fall is my favorite season.  Those who know me better might say that I have an unhealthy obsession with all things autumnal.  It’s okay, I’ll own up to it.  I sometimes feel as though the fall was specifically designed with my likes and preferences in mind.  Someone took a good look at what I most like to eat, wear, think about, participate in, discuss, and enjoy, and bundled it all up into one stunningly perfect three-month period.  Let’s just say, the fall fits me like a freshly-knitted glove.

To celebrate the new season, my boy took me to Heinz Orchard yesterday for a quality apple picking date.  Swooon.  This has become somewhat of a tradition.  It usually begins with me stockpiling apple-based recipes for weeks in anticipation, and then usually ends with me cooking apple-based treats for weeks afterwards, until the boy begs for just one apple-free meal. 

This year’s trip has proved to be no different.  And after lugging two pecks of apples (roughly 70) back to my small Chicago apartment, I immediately set to work turning them into my favorite things to eat.  So far, I’ve made apple butter, butternut squash and apple soup with bacon, and the tastiest pancakes I’ve had in a good long while.  So tasty, in fact, that I’m going to share the recipe with you.  But before I do, please send me your favorite apple recipes!  I have a lot of apples to go through, and I need all the inspiration I can get.  So, without further ado…

Dutch gouda and raisin whole-wheat pancakes with apple-cinnamon compote
Makes enough for two

1 tablespoon butter
3 small apples, peeled, cored, thinly sliced
½ tsp cinnamon
1 tablespoon brown sugar

1 cup whole-wheat pastry flour
1 tsp baking powder
¼ tsp. salt
1 tablespoon sugar
1 egg
1 cup whole milk
¼ cup raisins
½ cup Dutch gouda or other cheese, shredded finely
butter, for greasing skillet

Step one:  make apple compote.  Heat butter in skillet over medium-low heat.  Add apple slices, cinnamon, and brown sugar, and stir until evenly coated.  Cook apples, stirring occasionally until very soft, about 20 min.  If the mixture becomes too dry before apples are done, add ¼ cup water.

Step two:  Pour ¼ cup boiling water over raisins and set aside.  Water will absorb into the raisins to make them soft.

Step three:  Mix together flour, baking power, salt, and sugar in a bowl.  In a separate bowl, beat egg and milk until well mixed.  Pour wet ingredients into dry and stir just to incorporate.  Add softened raisins and shredded cheese and mix to incorporate.

Step four:  heat buttered non-stick skillet over medium heat.  Pour ¼ cup of batter into skillet and cook pancakes until golden brown on both sides.

Step five:  Sprinkle pancakes with powdered sugar and top with apple compote.  Drizzle pure maple syrup on top for additional sweetness if desired.

-Adriana

Friday, September 25, 2009

nigel slater's plum (i mean apple) cake

Apple Cake and Cream

"I have always felt that a recipe should be something to inspire, remind and lightly influence rather than a set of instructions to be followed, pedantically, to the letter."
-Nigel Slater


Since I bought Nigel Slater's The Kitchen Diaries a few years ago, it's made every move with me. Dorm to dorm to house to house to apartment, The Kitchen Diaries is always the key book that gets packed, right after the socks and rainbow flair and other daily essentials. It's like a security blanket to me, the book I can pull out when I feel like plopping down on the couch and reading with a cup of tea.

This book has served me well. It's just as good to cook from as it is to sit and read. It's organized by seasonality into months, so I can easily flip to the right section when I want to make something and don't quite know what. And to be truthful, I think Nigel and I may be connected by blood in some far-off capacity. Learning about his sensibilities around food feels like coming home to me, and he's always saying what I mean better than I could.

First Fall Apples

Nigel loves food when it's dressed-down, unfussy. He takes his fruit just at the tip of its freshness, spilling over into too-done juiciness. He isn't particular about measuring and doling out patronizing instructions; rather, he seems to know that you know what's best and that you know what you like.

In short, I felt that Nigel might just be okay with me making his plum cake with what I had on hand instead: the first little New England McIntosh apples of the season. I took a few liberties, as well, baking it in a springform pan instead of a square pan because I didn't have one, and substituting quite a bit of the flour with white whole wheat flour. I don't think this cake was worth for the wear. Crumbly and stuffed chock-full of apples, it uses very little sugar and flour, making it just as nice to serve alongside your breakfast eggs and coffee as it is as an after dinner treat topped with vanilla whipped cream.

Butter and Sugar, Natural Light

Nigel Slater's Plum (I Mean Apple) Cake
Adapted form The Kitchen Diaries

 10 Tb butter
1/2 cup sugar
6 McIntosh apples
3 large eggs
2/3 cup white whole wheat flour
1/3 cup all-purpose flour
1 3/4 Tbs. baking powder
2/3 cup ground almonds
1/2 cup shelled walnuts

Set the oven to 350 degrees. Line the base of a square 8-inch cake pan or springform pan with parchment. Grease the pan's sides.

Beat the butter and sugar until pale and fluffy with an electric mixer. Beat it until it is, as Nigel says, "light, soft and the color of vanilla ice-cream". Peel and core the apples and cut each one into eight sections.

Break the eggs, beat them lightly with a fork, then add them bit by bit to the butter and sugar. Whisk together the flour and baking powder, and fold them gently into the mixture using a wooden spoon. In a food processor, grind 2/3 of a cup of almonds until they are the texture of cornmeal, and fold them into the batter. Chop the walnuts to "the size of small gravel" and fold them in, too.

Scrape the mixture into the cake pan, dropping the apple sections in on top. Push the apples down into the batter a bit. Bake for 45 minutes, then test for doneness by inserting a paring knife to the bottom of the pan. If it comes up clean and free of batter, the cake is done. Remove the cake from the oven and let it cool for fifteen minutes before turning it gently out of the pan.

Cut into slices, and serve alone, with whipped cream or a drizzle of heavy cream.

Serves about 12


Apple Cake -Kylie

Tuesday, September 22, 2009

cast iron cooking

benefits of cast iron


This weekend, I discovered the magic of cast iron cooking. I'm now hooked. I've been wanting to start cooking with cast iron for a few years now, and I even have an old cast iron skillet that I purchased at an antique store sitting in the bottom of my closet at my mom's house. I mean to bring it back to New York every time I visit home. Somehow, though, at the end of each trip, I talk myself out of lugging the hefty iron mass back across the U.S. in my suitcase, and the pan remains there, un-seasoned though not unloved, for another several months.


Enter Crate & Barrel. Mary and I have had a gift certificate from there burning a hole in our pockets ever since we moved into our apartment, and we finally got into the city to shop this weekend. With it, we picked up a french press for making coffee and herbal infusions, the Baked cookbook (oh yum), and a sizeable, pre-seasoned cast iron skillet. 


After a day of cooking together, my skillet and I are tight. It has far more benefits than I previously thought. My original desire for a cast iron pan was born from a need for cookware that could go from stovetop to oven, as we previously had none. That was only scratching the surface of this pan's great qualities. Cooking with cast iron is actually an excellent way to add iron to your diet, a nutrient which almost fifty percent of Americans, mostly women, lack. In addition, cast iron that has been seasoned is naturally non-stick and does not contain any of the carcinogens in modern non-stick cookware. Add to these qualities that it conducts and retains heat beautifully, and you can understand why I'm smitten.


So why isn't cast iron cookware more popular today? It's cheap, versatile, health-promoting, and makes delicious food. The thing about cast iron cookware is that it can last multiple lifetimes if you care for it properly. For marketers, this is a downside, because it means they sell fewer pans. For the rest of us, this is great. As long as you practice some routine maintenance, you can enjoy a lifetime of happiness with your new pan.


Unless the cast iron pan you buy is pre-seasoned, you must season it yourself before use. Calm down: it's not hard. Mark Bittman gives simple instructions here. You are then ready to cook. After cooking, just remember not to wash with soap. I use hot water and a hard-bristled brush to scrape off any left-behind food. Note that while most cast iron enthusiasts warn against using soap on your cast iron, others swear a mild soap is fine and, at worst, will only cause you to have to re-season it before the next use. After washing, dry the pan immediately to prevent rust and apply a thin coat of oil such as grape seed or coconut to the cooking surface, wiping away any excess. Store your cookware in a dry place, and you can look forward to a long and happy life together. 


frittata recipe


Now that cast iron has found its way into our home, I was finally able to make this frittata that I've been lusting after. I don't need to give you the recipe, as Tea has provided an excellent one here, which you can alter to your liking.


-Kylie

Sunday, September 20, 2009

Er...hello.


Please, please, please, don't be mad at me.  From the looks of it, it’s been 3 months since my last post, and all I can say is…woopsie daisy.  Don’t fret, I thought about you ever day we were apart.  Plus, I have a really good excuse, I promise!  I do!  Ok, I’ll just come right out and say it.

I’ve enrolled in Culinary School! (yay)

That means that each day at 4 pm, I shut down my work computer, grab my knife kit, school books, and uniform, and leave my downtown cubicle in the dust.  Then from 5:30 to 10:30pm I’m brunoise-ing, and sauté-ing, and tourne-ing, and degrassier-ing.  I’m playing with santokus, chard, halibut bones, and china caps.  I’m taking copious notes on the proper way to cream garlic, and when you must and must not salt the boiling water.

In other words, I’m having the time of my life.

It took me some weeks (ok, some months) of trial and error to figure out how to fit my regular life into my new work/culinary school packed schedule.  But now I’m back and more excited than ever before to share with you some new favorite dishes and fancy restaurant techniques (straight from Le Cordon Bleu instructors!) If you want an even more detailed account of the life of a culinary student, check out Hillary’s blog.  She’s one of my new culinary school buddies, and she’s super awesome.  As for me, I’m going to continue on much like before, but hopefully with slightly more successful recipes!

And with that, I'd like to tell you about the best meal I've eaten in months.  I wish I could credit it's success to the fact that I'm paying someone to tell me how to cook better.  But I can't.  Nope.  This time, every last ounce of credit must go to the incredible farmers who sell their stunning produce at the Green City Farmer's Market here in Chicago.  Last Saturday, I found myself snatching up purple haze carrots, multi-colored sweet peppers, dinosaur-egg plums, long ears of golden corn, and the most exciting finds, the sweetest green, yellow, red, and purple cherry tomatoes I've ever tasted and an armful of fresh-as-can-be basil. 

As any cook knows, there's only two things to do when you have oodles of basil: 1) make a bucket of pesto, and 2) invite your friends over to help you eat it.  So, that's how my impromptu Sunday night dinner party was born.  It was clear that such beautiful basil could not be wasted on the dry, flavorless noodles from the pasta aisle of the grocery store, so the first step would have to be rolling out my own fettucine.  If you've never rolled your own pasta before, my goodness, I suggest that you try it.  Not only will it result in a vastly more tasty noodle, but I can guarantee you will also have a most excellent time making it.  That being said, if you don't have access to a pasta roller, I might suggest splurging for fresh pasta instead of the boxed stuff, because really, fresh basil deserves no less.

A Late Summer Sunday Night Pasta Party Menu:

whole-wheat, handmade pasta with market-fresh basil pesto
 

heirloom cherry tomato and fresh mozzarella salad


Pasta Ingredients: (makes 1 lb.)
2 cups flour
2 extra large eggs
2 teaspoons olive oil
1/4 teaspoon salt

Pesto Ingredients: (makes 1 cup)
2 cloves of garlic
3 Tablespoons pine nuts
3 cups basil leaves, no stems, washed and dried
a heaping 1/2 cup freshly grated parmemsean
1/2 cup extra virgin olive oil
salt to taste

Cherry Tomato Salad Ingredients:
1 pint fresh heirloom cherry tomatos (the more different colors, the better)
1/2 pound small fresh mozerrella balls
Basil, chiffonade

Step 1:  Make your pasta.  Like I said, making pasta is not nearly as hard as it looks.  Everyone has their favorite ratio of ingredients and method of pulling it together, and unsurprisingly mine can be found in Deborah Madison's Vegetarian Cooking for Everyone.  I prefer using the "well" method, and since an image is worth 1000 words, I've attached a youtube link showing you how to do it.  After finishing your pasta, lightly flour it and set it aside while you prepare the rest of the meal.

Step 2: Make your pesto.  Using a food processor, combine the garlic, salt and pine nuts until finely chopped.  Add basil and olive oil and blend until smooth.  Add cheese and process long enough to combine, but no more.

Step 3.  Make your salad.  Depending on the size of the tomatoes, you may want to cut them in half.  I did, but this is by no means necessary.  Toss the tomatoes with mozerella in bite site pieces.  Sprinkle with the chiffonade of basil, and serve fresh. 

Wednesday, September 9, 2009

the pizza at delancey


I'll admit it: I'm a food blogger stalker.


I love food blogs. Before Adriana and I started this one, I pored over and adored the blogs of others for years. Food bloggers were like the cool kids in high school, but way better. They received the bounty of the land and cooked it into deliciousness, then wrote about it eloquently and with such warmth it made me feel as if I could be the best of friends with them. Becoming a food blogger was that thing that I knew I could do, but that I didn't want to do for fear that I couldn't measure up to what was out there.


Thankfully, I have a really great friend in the Land of Deep Dish Pizza who makes me feel a lot less timid about doing things. We started a blog, and we keep on working at it and trying to make it better. Still, I think I can speak for both Adriana and myself and say that we're thoroughly in awe of other bloggers. One of the many blogs I adore is that of Molly Wizenberg, Orangette.


Back in the spring, I trucked to a bookstore in Chelsea after a particularly arduous day of work to hear her read from her book, A Homemade Life, and have her sign it. If I believe in what someone is doing, and they seem like a really nice person, chances are high that I'll be excited to support them. When Molly announced that her husband, Brandon Pettit, would be opening a restaurant in Seattle, I couldn't wait to pack my bags to go and eat there.

So it was that, after many months of antsily waiting and following Delancey's progress on Orangette and Twitter, the restaurant was open, and I was in Seattle. I dragged my friends along to tease me about being a food blogger stalker as I pointed out to them Brandon, and Molly, and The Chef (of Gluten-Free Girl fame) with pride.


While it may seem to you that I'm a tad partial to this restaurant, I've got to say: Go to Delancey. Go now. Do not wait. Even if you're not as obsessed with food and food bloggers as I am, I think you'll love this place. The restaurant is sparse yet warm, somehow charming in its almost barren decor. The Italian pizza oven entrances you with its neon flames while you wait for a table. The salad we had was unbelievably fresh, and perfect in its simplicity. Then there was the pizza. We tried the Padron, which you need to have if you really love spice; the crimini, bedecked in thinly sliced mushrooms and thyme; and the Brooklyn, a pie that embodies what pizza should be.


While usually I would have stopped with the pizza, we knew we had to try Delancey's desserts. And so we did: A warm chocolate chip cookie ready to be dunked in a glass of creamy milk, and a blackberry yogurt popsicle served in a shot glass. Incredible.


Do I need to say it again? Go. Go to Delancey now.

-Kylie
 

Subscribe in a reader

Adriana Willsie and Kylie Springman ©2009